USB Booting
Hiren’s BootCD PE supports UEFI booting from DVD and USB flash drives. To format, re-partition your USB drive and to copy the ISO content into your USB drive properly, we have developed Hiren’s BootCD PE – ISO2USB portable tool. You need Administrator privileges to run it. It is free both for commercial and non-commercial use. Requires Windows 7 and later.
Please note that, all data and partitions on your USB flash drive will be lost. Before doing the steps below, don’t forget to backup the files on your USB flash drive:
Hiren's BootCD PE - ISO2USB v1.0 (x86)
Download ISO2USB.exe to your computer.
Choose Device and ISO
If the ISO file is located in same folder with the exe, then it will be automatically selected. Otherwise you can drag and drop the ISO file over the application window or you can select the ISO file manually.
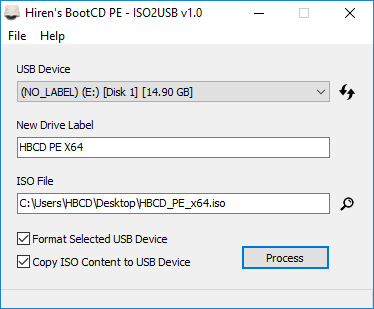 |
Set Label and Process
The application will ask if you are sure to continue. Click Yes if you are sure to format your USB Flash Drive, lose the partitions and data in the drive. If you click Yes, the process will begin and then will be completed like below if there is no problem.
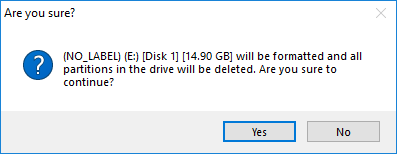 | 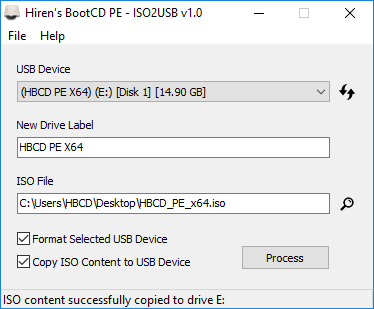 |
How to create a Windows 10 UEFI boot media using Rufus

When installing a clean copy of Windows 10, usually you connect a USB media to the device to launch the "Windows Setup" wizard to continue with the installation process. However, if you have a computer with a Unified Extensible Firmware Interface (UEFI), instead of the legacy Basic Input/Output System (BIOS), it is crucial to use the appropriate media for the system firmware type.
On Windows 10, there are at least two methods to create a USB bootable media. You can use the Microsoft Media Creation Tool to download the files onto a removable storage with support for both firmware types (UEFI and legacy BIOS). Or you can use a third-party tool called "Rufus," which makes it easy to create a USB to install Windows with support for UEFI.
In this Windows 10 guide, we will walk you through the steps to create a USB flash drive that includes support for UEFI using the Microsoft Media Creation Tool and Rufus.
How to install Windows in Legacy mode
The following procedure refers to installation of Windows 7/8.1/10, in Legacy mode only!
For installing Windows in UEFI mode please refer to How to install Windows in UEFI mode.
Preparing bootable USB drive
- Download Rufus application from: Rufus
- Connect USB drive to any computer. Make sure to disconnect all other USB mass storage devices.
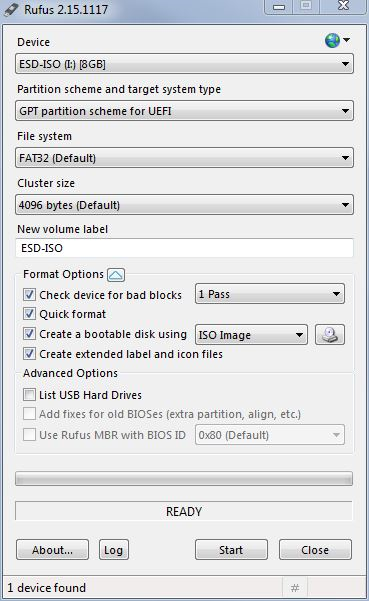
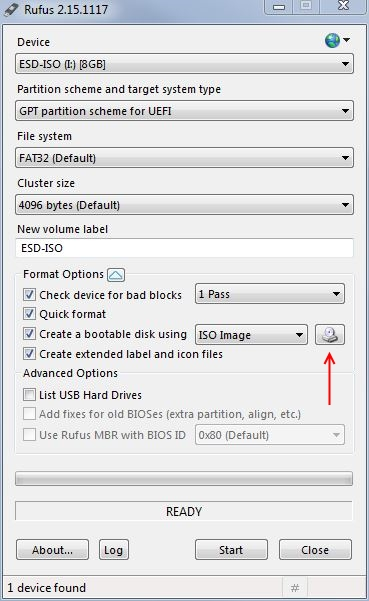
- Run Rufus application and configure it as described in the screenshot.
- Choose the Windows installation media image:
- Press Start button to proceed.
- Wait until completion.
- Disconnect the USB drive.
Installing Windows on Phoenix BIOS systems
- On the target PC set USB to be the first boot device in the boot order (in BIOS).
- Connect the prepared bootable USB drive to the target PC and boot from it.
- Press F5 during boot until the One-Time-Boot menu appears.
- Choose the USB HDD option from the list of bootable devices.
- Windows installation process will start.
Installing Windows on AMI BIOS systems
TBD
How to install Windows in UEFI mode
The following procedure refers to installation of Windows 8.1/10, in UEFI mode only!
For installing Windows in Legacy mode please refer to How to install Windows in Legacy mode.
Preparing bootable USB drive
- Download Rufus application from: Rufus
- Connect USB drive to any computer. Make sure to disconnect all other USB mass storage devices.
- Run Rufus application and configure it as described in the screenshot:
- Choose the Windows installation media image:
- Press Start button to proceed.
- Wait until completion.
- Disconnect the USB drive.
Installing Windows on Phoenix BIOS systems
- On the target PC set USB to be the first boot device in the boot order (BIOS defaults).
- Connect the prepared bootable USB drive to the target PC and boot from it.
- Press F5 during boot until the One-Time-Boot menu appears.
- Browse to the Main -> Boot Features menu and set the CSM Support setting to No.
- Press F10 and Yes to save the changes, and Exit.
- Press F5 during boot until the One Time Boot menu appears.
- Choose the USB HDD option from the list of bootable devices.
- Windows installation process will start.
Installing Windows on AMI BIOS systems
TBD
Install Windows XP on Asus Eee PC
Summary
- Introduction
- What do you need
- Creating a bootable USB stick (or hdd)
- Installing Windows XP from the USB stick
- Installing ASUS Eee PC drivers
- ASUS Eee PC Tips and Tricks (hardware & software)
- Article references
In December 2008 i bought online with my credit card (thanks to ePayment) four Asus Eee PCs 4G Surf (two white and two black models) from PCfun. I liked the white ones better so i kept one for myself and the rest i gave them to the family members. Being my first gadget, i was and i'm still very excited about its features. All models come with a friendly linux distro from which you can connect to the Internet very fast. When i got my Eee PC out of the box it took me about 1 to 2 minutes at most to connect to a free wireless network and surf the net. Sweet! I downloaded an MP3 and listened to it just to check the sound and the incorporated speakers from the LCD panel.
I like Linux, but running it as a desktop has no use to me, so i quickly decided to install Windows XP. Let's see how i did it.
PS: most of the tips here might also work with any other desktop or notebook as well.
- your desktop computer (this is NOT your ASUS Eee PC)
- one image or a cd with Windows XP
- a stick (1Gb is fine) or a USB hdd - make sure you don't have partitions on it or you may loose them in the process
- USB Multiboot software (choose one of the following download locations: CD Forum download, BootLand download, Siginet download)
- your ASUS Eee PC later
3. Creating a bootable USB stick or USB hdd
If you are in hurry or know what you are doing but forgot some steps, check out this great video tutorial (go to 02:45 min to skip the chit-chat):
- Extract USB Multiboot and browse USB_MultiBoot_10/ folder and then run USB_MultiBoot_10.cmd
- Press any key
- Type H and press ENTER
- HP USB Disk Storage Format Tool screen will appear. If this does not find your USB device you can format it manually from Windows and press 'Close' or you can go back and try option P. Check 'Quick format' and press 'Start'
- In the multiple option screen press 0 and hit enter to toggle between USB Stick and USB harddisk. This is very important because the Windows XP will not install proper if you have a USB harddisk like this one. The 'USB Stick' medium is selected by default.
- Type 1 and press ENTER and then select the Windows XP source (this is the CD or a path on the HDD where your have your XP installation files)
- If you get a message about 'winnt.sif' press 'YES'
- in the 'Unattended Install' screen fill the fields with values (also with your serial). If you fill the fields now you will not need to complete them later in the Windows XP installation screen. When you're done press 'Cancel (no changes)'
- Type 2 and press ENTER and select your USB device
- Type 3 and press ENTER, you will see some files copying on the USB drive. During this you might be asked 'Copy XP and extra sources on the USB?' and press 'Yes'. Now wait couple of minutes (this depends on your system and USB drive speed). You will also get the message 'FileCopy to USB-Drive is Ready - OK - Success' and press YES (Make USB-stick in XP Setup to be Preferred Boot Drive U:)
- All done just press any key
4. Installing Windows XP from the USB stick
- Connect the USB drive to your ASUS Eee PC
- Start your netbook and in the first screen press F2 to enter BIOS.
- In the BIOS screen go to 'Advanced' tab and change 'OS Installation' to 'Start'.
- Next in the 'Boot' tab under 'Hard Disk Drives' select the USB drive as the 1st Drive
- Also in the 'Boot' tab but under 'Boot Device Priority' section you should see the USB drive as the 1st Boot Device
- 'Exit & Save Changes' made in the BIOS.
The netbook will reboot. You wait couple of seconds and see the following screen:
1. Begin TXT Mode Setup Windows XP, Never unplug USB Drive Until Logon
2. and 3. Continue with GUI Mode Setup Windows XP + Start XP from HD 1
4. Start GRUB4DOS Menu - DOS FPY IMAGES + Linux + XP Rec Cons + VISTA Attended Setup XP, Never unplug USB Drive Until After Logon
You will select 1 and press ENTER. This will start the standard Windows XP setup install (format quick NTFS, create partitions etc). After the setup finished to copy all the files needed it will reboot. Now select 2 and 3 (it's a single tab option). This will continue your installation (the classic graphical Windows install). This might take 20 to 40 minutes. When this is done the netbook will reboot (DO NOT UNPLUG THE USB DEVICE YET!), select the 4th option then the last 'Start/Boot Windows XP from HDD'.
5. Installing ASUS Eee PC drivers
Now you are logged in in Windows XP but you can't do anything because you need the Asus EEPC drivers which can be found on your CD that is shipped with your Asus package. If you don't have the CD then download the drivers from the following locations: RapidShare.de , MegaUpload.com . You will need to unrar the archive and copy it to the stick (create a folder like asuseeepc_drivers/). This folder will contain the following subfolders: ACPI, Audio, Chipset, LAN, Touchpad, vga, Wireless. I suggest you first install the ACPI and Chipset drivers and then the rest. Try to locate the .exe that triggers the installation to start.
6. ASUS Eee PC Tips and Tricks
a. Hardware
There is a big difference between the white and the black models of ASUS Eee PC 4G Surf. The black model Eee PC 4G SURF (4GS-PK008) has a hatch (turn it upside down and you will see it) that allows you to comfortable change the RAM. The white model Eee PC 4G SURF (4GS-W010) lacks of this ability and you will have to disassemble the netbook to upgrade it.
My ASUS Eee PC 4G Surf came with 512Mb of RAM memory and i've succesfuly upgraded it to 2Gb. If you want to upgrade it follow this nice video tutorial.
My ASUS Eee PC 4G Surf came with a solid state HDD with the capacity of 4Gb (this is the internal harddisk). After you install Windows XP you will have around 3 to 2.5 GB left. You can use an external USB drive as a secondary partition and install software, play games, etc. It has to be an USB device with resonable access speed.
If you find browsing with the Touch Pad hard, then i may suggest you go buy the following Microsoft Optical Mouse 500 which i tested and it's tiny, it also has a short cable.
b. Software
I recommend using Windows XP on the ASUS Eee PC with the following settings: System Restore OFF, System Properties -> Advanced tab -> Performance -> Settings -> Visual Effects set to 'Adjust for best performance', here also on the Advanced tab -> Virtual memory change 128 Mb and maximum 256 Mb if you HAD a memory upgrade on the netbook!
Go to Start -> Cmd and in the command prompt type sfc.exe /purgecache. This command does magic, i had 780 mb free space, and after this command i had about 1Gb.
To save space go to C:\WINDOWS\Driver Cache\i386 and delete all the files. You can do the same with the files and folders from C:\WINDOWS\Downloaded Installations when you're done installing software on your Asus Eee PC. Eg. If you install Dreamweaver 8 you will probabil find there a folder called Macromedia Dreamweaver 8 with the main .exe installer and some other files.
Make sure you disabled the system restore from My Computer -> System Restore tab
I was able to run Heroes3 Complete series directly from an external USB device. In the game you will have a small scroll on the bottom of the screen but that will not bother your on this kind of static games. I also played this game wireless with other ASUS Eee PC (now that's a dream come true!)
I was able to run Microsoft Virtual PC 2007 (download here) being installed on C: and running the .vhd (663Mb) and .vmc (12kb) directly from stick. I installed Windows 98SE, mounted Hopkins FBI game and succesfully played it.
I have succesfuly played Starcraft BroodWar on my ASUS Eee PC. I ran it directly from an attached USB stick, also played on BattleNet dozens of games. If already bought Starcraft but want a light version, download this one (100mb) from theabyss.eu.
When you are watching movies on Youtube with Firefox it is recommended to go in Full-Screen mode by pressing F11 or go to 'View' -> 'Full Screen'
If you want to read Word, Excel or Powerpoint files on your Asus Eee PC, download the following free applications from Microsoft's site: Microsoft Word Viewer 2003, Microsoft Excel Viewer 2003, Microsoft PowerPoint Viewer 2003. Note that you can only read, not write! For that you need the Microsoft Office CD or iso.
c. General
Never lift the Eee PC by the display panel
Fully charge the battery before first use and whenever it is depleted to prolong battery life. Be aware that it takes much longer to charge the battery when the Eee PC is in use.
On the lower right of your Eee PC keyboard you will see four LED indicators: Power indicator,
Battery Charge Indicator,
Solid State Disk (SSD) indicator and
Wireless indicator. When the Battery Charge Indicator blinks that means that the battery is less than 10% and AC power is not connected.
It is actually not recommended to use your Eee PC on soft surfaces as beds or sofas because it blocks the vents and the bottom of the netbook can get hot. For example if you let it in your bed and you are watching a movie, you might hear a little noise of fans increasing the speed of ventilation - this is normal.
If you want to use you Eee PC with a projector you can use the 15-pin D-sub monitor port, located on the right side, which supports standard VGA devices.
Your Eee Pc has three USB 2.0 slots and 1 memory card slot. This will allow you to attach removable devices such:
- USB mouse
- USB external optical disk drive
- USB external hard disk drive
- USB flash memory disk
- MMC (Multimedia Card)
- MMC Plus
- RS-MMC (Reduced Size) (with MMC adapter)
- SD (Secure Digital)
- MiniSD (with SD adapter)
- microSD
- SD adapter
RAID/SATA SETUP WITH WINXP
- Slipsteam the RAID/SATA drivers to the XP Setup and create an updated driver setup disc
- Load the SATA/RAID drivers from floppy (USB Floppy needed for laptops)
- Slipstream only needed driver to the disc using nLite (Not providing help for this one since not written by me & credits to zea)
! I would recommend that if possible use a CD-RW for your work unless of course you don't mind throwing a CD in case something mess up !
! As to simplify most of the errors that i get through PM, I recommend you to use the vanilla version of Windows XP aka clean setup itself without slipstreams. Avoid any "D3vil SP3 Edition" or such. This is due to the fact that some of these CD might have already been slipstreamed with drivers before and the tools listed here might not recognise the previous slipstreamer and mess up the CD. !
There is an increasing amount of thread on the matter and wish that i could be of some help and solve it easy way. I dare not put this in the Guide section so hopefully if its not appropriate here too, Mods please delete the thread or move it elsewhere. Thanks.
Opening :
Even with the existance of Windows Vista, XP nonetheless is still the choice of OS for a lot of people for now. But because of how old XP is to date and with the emerging of new technologies, the original drivers that came with the XP Setup itself is almost obsolete.
To cut the crap short, laptop doesn't have a floppy drive and XP is unable to load SATA/RAID drivers from another location besides floppy. Of course, not all laptop BIOSes can enable native SATA to emulate PATA hence the existance of this guide. So the only ways to install XP on your ub3r new laptop that runs SATA HDD would be to update the driver database in XP Setup itself.
Tools needed :
- Windows XP Setup CD
- DriverPack
- CDIMAGE GUI (http://unattended.msfn.org/files/global/CDIMAGE_GUI.EXE)(Copy and paste link in new window)
- CD/DVD Burner to burn CD
First of all, copy the contents of your CD to a working path, in this case i'll use C:\WINXP
Download DriverPack BASE from the link above as well as DriverPack MassStorage. Extract the BASE pack into a new folder and put the MassStorage pack you downloaded into the DriverPacks folder.
Run DriverPack...
Select "disc" and choose "Browse". Browse the folder which you copied from the CD earlier and in this case it would be my C:\WINXP.
If the setting is grey out like the image below :
The solution : DO NOT extract the downloaded files into DriverPacks folder. Leave intact as is (i.e. copy that archive into DriverPacks folder). The DPs_BASE will automatically do the extraction. See the image below :
If you do it right, you can have the selection as below
Credits: keyz
Execute DPs_BASE.exe and use the installation platform selected to disc. Browse to the XP working directory you copied from the CD just now, in my case C:\WINXP earlier. Select the DriverPacks list that will appear after loading the working directory and put a check mark on DriverPack MassStorage. Put a tick in the box which says "DriverPack MassStorage text mode". Leave all the other settings as it is if you don't know what is it for.
After you're done with everything, hit the SlipStream! button and wait for the process to finish. The process should finish in around 10 minutes. After the slipstream process is finish, proceed by downloading CDIMAGE GUI. Extract and run the application, only change the "Root DIR" to your working directory in my case C:\WINXP and the "Iso file Path" to where you want to save the ISO file generated.
Select the boot.img file to load the bootable image into the ISO file.
Leave all other settings intact as it should unless you know what its doing. (Thanks Sk8teR)
After the ISO file is generated, burn it with any burning software to a CD and proceed with booting the setup. Your SATA hard drive should be recognised now without the need to press F6 and load drivers.
The DriverPack should contain most SATA/RAID device drivers so it should work on most computers.
The End.
Slipstreaming SATA driver into WinXp boot cd using nLite
A) Go to "Shrink Vista Partition for WinXp Installation" if you don't have any partition to use.
B) If you have an empty partition for WinXp installation, proceed to "WinXp Installation
Install Windows XP in Compaq Presario CQ40-115AU and drivers
Step :
~~ AMD SATA RAID driver ~~
AMD RAID 7xx Floppy Configuration
download link :
https://a248.e.akamai.net/f/674/9206/0/www2.ati.com/gamesite/8-8-igp_xp32_dd_ccc_wdm_sb_gart_enu_67975.exe
Extra that ATI APP and go the folder :
XXX(ATI APP EXTRA NAME) -> SBDrv -> RAID7xx -> copy all data inside to de FDD
Windows XP for Configuration FDD , useing the USB FDD Device and run the boot Windows XP useing booting CD and click F6 for Configuration AMD SATA RAID , click SATA RAID Contorller X86 for Windows XP 32-bit system , now u can see the hard disk and no have a blue screen !
Driver list : ~
- Chipset and Graphics System ( befor install chipset and graphics ) -
Microsoft .NET Framework v2.0 Redistributable Package (x86)
- download link -
http://tinyurl.com/758p8
- Chipset and Graphics -
ATI HD 3200 Catalyst Software Suite
- download link -
https://a248.e.akamai.net/f/674/9206/0/www2.ati.com/gamesite/8-8-igp_xp32_dd_ccc_wdm_sb_gart_enu_67975.exe
- Ethernet (LAN) -
Realtek RTL8102E Family PCI-E Fast Ethernet NIC
- download link -
http://www.radarsync.com/driver/d275761-realtek_rtl8168c_p_8111c_p_pci_e_gigabit_ethernet_nic
- Audio System ( befor install audio )-
Microsoft Universal High Definition Audio Architecture UAA
- download link -
ftp://ftp.hp.com/pub/softpaq/sp33501-34000/sp33867.exe
- Audio -
IDT High-Definition Audio CODEC
- download link -
ftp://ftp.hp.com/pub/softpaq/sp39501-40000/SP39671.exe
- Card Reader -
JMB38X Card Reader
- dowload link -
http://h10025.www1.hp.com/ewfrf/wc/softwareDownloadIndex?softwareitem=ob-63773-1&lc=en&dlc=en&cc=us&lang=en&os=2093&product=3752107
- Modem -
High-Definition Audio (HDA) Modem
- download link -
http://h10025.www1.hp.com/ewfrf/wc/softwareDownloadIndex?softwareitem=ob-61697-1&lc=en&dlc=en&cc=us&lang=en&os=2093&product=3752107
- CIR Receiver -
ENE CIR Receiver
- download link -
http://tc.versiontracker.com/product/redir/lid/1508335/CIR.zip
- Touchpad -
ALPS Touchpad Driver
- download link -
http://tc.versiontracker.com/product/redir/lid/1499432/Touchpad_Synaptics_ALPS_v11.0.2.0_v7.0.1101.18_XP.zip
*useing ALPS Touchpad , this ZIP have 2 touchpad Sysnaptics and ALPS , using ALPS Touchpad
- Wireless -
Broadcom Wireless
- download link -
ftp://ftp.hp.com/pub/softpaq/sp39501-40000/sp39912.exe
- Processor -
AMD Turion Dual Core 64 Processor
- download link -
http://www.amd.com/us-en/assets/content_type/utilities/AMD_Processor_Driver_1320053.zip
- HP System -
HP Quick Launch Buttons
- download link -
ftp://ftp.hp.com/pub/softpaq/sp39001-39500/sp39425.exe
- Other Devices ( Unknow Device ) -
Direct Application Lauch Button
- download link -
http://www.c-tech.ac.th/ngology/BackUPDriver/Direct%20Application%20Launch%20Button%235/
P.S : download machine.inf and update all the unknow device will ok ady , this system not inportend to the Windows XP ! this is ppl share link , may will be closeing any time !!!
Hope all can Install it !!
Windows XP Setup Could Not Detect and Find Any SATA Hard Disk Drive on AHCI Mode
On newer computer and workstation system, such as Dell Precision model, if the SATA HDD is not running on RAID, there is no additional driver needed even for older operating system such as XP to recognize the drive. On SATA based disk that requires a driver, normally the system OEMs or motherboard manufacturers will provide a floppy disk with needed SATA driver, which you can then use F6 button during initial setup stage to add in third-party RAID or SCSI drivers. On newer computer such as those from Dell, HP, Acer, Lenovo, and etc, you probably find that only diagnostics or drivers CD is provided. The worse problem is that you simply cannot extract the SATA drivers from the CD as the driver that wanted to be installed during XP setup must be accompanied by a file named oemsetup.txt, beside the usual driver files and .INF file, else the SATA driver cannot be installed by XP setup to detect HDD.
Here’s a possible solution if you’re in this kind of SATA hard drives not found situation. The trick is related to ACHI (Advanced Host Controller Interface) hardware mechanism which are designed to allow software to communicate with Serial ATA (SATA) devices such as host bus adapters with features not offered by Parallel ATA (PATA) controllers such as higher speeds, hot-plugging and native command queuing (NCQ). Windows XP (and any OS older than Vista or linux kernel 2.6.19) does not have came pre-packaged with driver to support AHCI/SATA mode, thus creating a very common error that Wikipedia also described as “when attempting to install Microsoft Windows XP or a previous version on an AHCI-enabled system will cause the setup to fail with the error message ’set up could not detect hard disk drive…’”.
The ultimate solution is by using OEM Windows XP CD which comes with your system, which usually has built-in appropriate driver for S-ATA harddisks running in AHCI mode. However, if you lose or do not have the OEM XP CD, or is given Vista DVD but decide to downgrade to XP, there are 2 options to install XP from scratch.
Users can install Windows XP or Windows XP SP2 (Service Pack 2) on an AHCI enabled system by changing BIOS setting to disable AHCI (or RAID which includes AHCI in its functions) and use native SATA IDE emulation mode (SATA/PATA). In SATA IDE Emulation mode, XP setup could find the SATA drives and proceed to continue to install XP properly. How to change the BIOS settings on SATA mode is depending on which brand or model or even motherboard of your computer system. Check your system manual for more information. For example, in Dell Precision workstation, press F2 to go into BIOS, and then go to “SATA Management” to select AHCI or SATA mode. If you don’t find any option in BIOS to change AHCI support for SATA ports, most probably the drives already runs in IDE (ATA) emulation mode and therefore doesn’t require the AHCI driver. It’s because AHCI support is depending on the chipset (commonly by Intel) and the HDD. In this case, you have to figure out what’s other causes that may stop your SATA disks from functioning.
A slightly more difficult but recommended method is to create a slipstreamed XP install disc with the Intel Matrix Storage Manager which is also the AHCI SATA Controller driver included. A slipstreamed XP setup CD with AHCI SATA controller driver allows the XP OS to support hard disk on AHCI and use its advanced features such as NCQ for faster access, read and write speed. While slipstreaming, users can also have the advantage to include all updates for Windows XP for up-to-date patched OS, without the need to download and install hotfixes later.
Panduan Membeli Komputer
Komputer adalah alat eletronik yang dahulunya hanya digunakan dipejabat tetapi kini komputer merupakan alat elektronik yang mesti ada disetiap rumah. Bagi pengguna yang baru berjinak-jinak dengan komputer tentu sukar untuk membuat keputusan untuk membeli komputer. Ia memerlukan pengalaman dan membeli berdasarkan keperluan supaya tidak membazir dan memenuhi kehendak pengguna itu sendiri. Fungsi utama komputer adalah menyelesaikan kerja-kerja harian, pembelajaran, permainan dan lain-lain hal. Motif utama memilih perkakasan komputer adalah untuk beroperasi dengan baik tanpa menghadapi masalah.
Jenis jenama komputer
Dipasaran anda mempunyai pilihan membeli komputer sama ada yang berjenama seperti DELL, HP COMPAQ, ACER, TOSHIBA, NEC, BENQ,TWINHEAD,ASUS,SONY atau komputer klon. Kebanyakan pengguna suka membeli komputer klon kerana harganya murah sedikit berbanding berjenama dan boleh dipasang mengikut perkakasan pilihan dengan jenama yang berlainan mengikut citarasa pengguna itu sendiri. Komputer berjenama pula sudah siap dipasang dari kilang pengeluar dan pengguna tidak perlu lagi memikirkan tentang jenis perkakasan komputer dan sebagainya.
Bagaimana dengan kualiti?
Sebenarnya kualiti komputer berjenama atau klon adalah sama. Cuma bezanya jaminan yang diberikan, dimana komputer berjenama jaminannya terus dari pengilang dan komputer klon dari kedai komputer. Biasanya komputer baru tempoh jaminannya adalah setahun.
Berikut panduan perlu diketahui ketika memilih perkakasan komputer mengikut kategori pengguna secara ringkasnya.
Pengguna Biasa
- pengguna yang biasa menggunakan komputer untuk menyelesaikan kerja harian seperti pemprosesan perkataan (Word), lembaran kerja (Excel), mencetak dan kerja-kerja pejabat.
Untuk komputer meja (Desktop).
Prosessor - 1.6Ghz (Intel atau AMD) keatas
256Mb DDR RAM
20Gb Hard Disk keatas
52x Pemacu CD
Pengguna Pertengahan
- pengguna yang biasa menggunakan komputer untuk menyelesaikan kerja harian seperti pemprosesan perkataan (Word), lembaran kerja (Excel), kerja grafik seperti Adobe Photoshop, kerja edit video atau audio seperti MP3 dan kerja-kerja teknikal seperti Microsoft Visio, AutoCAD, Rivet.
Untuk komputer meja (Desktop).
Prosessor - 1.8Ghz (Intel atau AMD) -keatas
512MB DDR RAM
40Gb Hard Disk - keatas
Pemacu CD Combo - mempunyai fungsi baca CDR,CDRW dan DVDROM
128Mb Kad Grafik (ATI atau Nvidia)
Pengguna Berat
- pengguna yang biasa menggunakan komputer untuk menyelesaikan kerja harian seperti pemprosesan perkataan (Word), lembaran kerja (Excel), kerja grafik seperti Adobe Photoshop, kerja edit video 3D atau audio seperti MP3 dan permainan komputer keluaran terbaru - Need For Speed Carbon, SIM City, Half Life, Counter Strike dan sebagainya. Untuk komputer meja (Desktop).
Prosessor - 2.0Ghz (Intel atau AMD) keatas
1GB DDR2 RAM
80Gb Hard Disk - keatas
Pemacu DVDRW - mempunyai fungsi baca CDR,CDRW, DVDROM dan DVDRW
256Mb Kad Grafik (ATI atau Nvidia)
_ _ _ _ _ _ _ _ _ _ _ _ _ _ _ _ _ _ _ _ _ _ _ _ _ _ _ _ _ _ _ _ _
Penjagaan komputer anda
Komponen-komponen pada motherboard

Cara pemasangan cable network 'straight' & 'crossover'


No comments:
Post a Comment